


Setting up a “development” environment for LaTeX is quite complicated compared to installing Microsoft Word 😉 And it gets even more complicated, if you decide to use Eclipse as the platform for writing your documents. However, as I had to setup such an environment from scratch today, here’s how I did it with minimum impact on the system.
- (Optionally) create a base directory in which all of the programs below will get installed, e.g.
D:\LaTeX. - Download MikTeX – Portable Edition and extract it to
D:\LaTeX\MikTeX. - Download and install the JDK: Java SE Downloads. If you have security concerns like me, make sure to download the latest version and enable daily updates and/or disable the Java plugin in your browser.
- Download Eclipse (the most basic version will do, e.g. “classic” or “for Java developers”) and extract it to
D:\LaTeX\Eclipse. - Start Eclipse and choose a convenient path for the workspace (where your LaTeX projects will get saved), e.g.
D:\LaTeX\Workspace. - Install TeXlipse into Eclipse: Help – Install New Software – Add a new repository with name “TeXlipse” and location “http://texlipse.sourceforge.net/”. Select all installable items as shown below. As you can see, Pdf4Eclipse will already be installed, too.
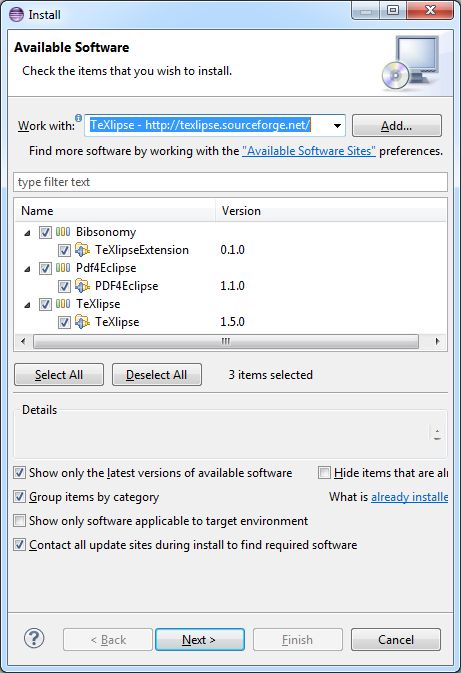
Simply click through the installation wizard and restart Eclipse after the installation is finished.
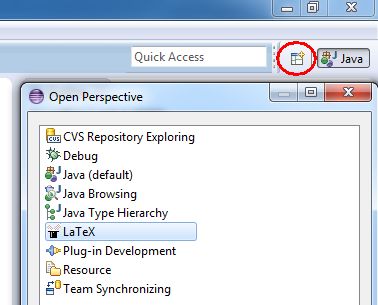
Warning: Starting with Eclipse Photon the version of TeXlipse shown above doesn’t work anymore. Please use the Eclipse Marketplace to install a newer version like 2.0.2. - After TeXlipse is installed, you should already be able to open the LaTeX perpective in Eclipse.
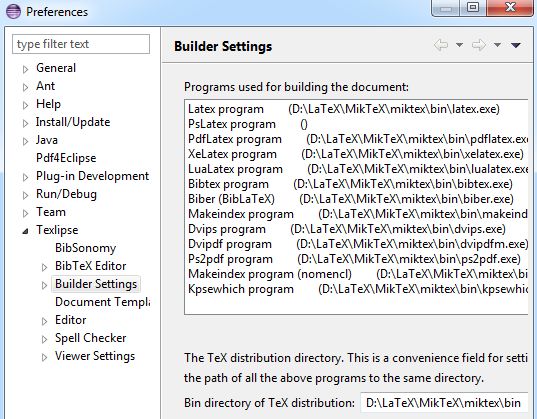
- Now it’s time to tell TeXlipse where it can find your LaTeX executables and therefore be able to compile your LaTeX documents. Go to Window – Preferences – Texlipse – Builder Settings, enter the path to your MikTeX executables –
D:\LaTeX\MikTeX\miktex\bin– into Bin directory of TeX distribution, and click Apply. That should automatically fill in all the needed programs in Programs used for building the document for you.
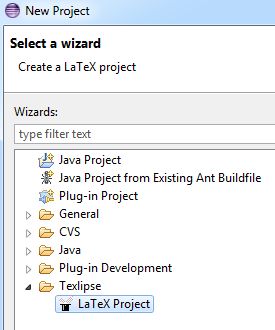
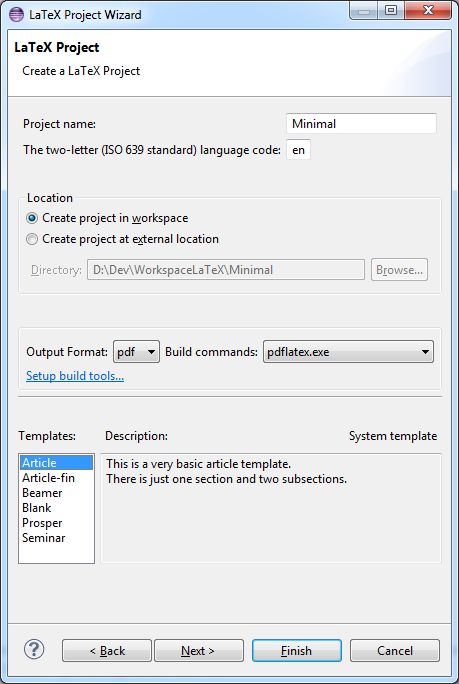
- Now you should already be able to create and compile your first LaTeX project. Right-click into your Project Explorer and create a new project.
If you savedocument.tex, it should automatically be compiled. Take a look at the corresponding console output.

- If you double-click on the created
document.pdffile in the Project Explorer (a Refresh may be needed to show the file), it should be opened with Pdf4Eclipse. If you double-click a line in the PDF file, Eclipse should now jump to the corresponding position in your LaTeX source. And that’s it! Now you can start writing your LaTeX document. If you need a template, take a look at these blog posts (they are in German):
Sehr gute Anleitung, danke!
Sehr hilfreiche Anleitung für jemanden, der bisher nur unter Linux und mit einem entsprechenden Editor mit Latex gearbeitet hat. Danke!
Tolle Anleitung. Allerdings reicht es für LaTeX, wenn man das JRE (statt des JDKs) installiert.
Für LaTeX vielleicht, aber nicht für Eclipse. Dafür braucht man ein JDK.
Sehr gute anleitung! Habe stunden rumgemacht! Mit deiner Anleitung ist man in 3min durch :-)!” DANKE <3
Pingback:Mysteriöse Fehler in TeXlipse nach Synchronisierung der Projektmappe – Frederic Reisenhauer
Danke, der Guide hat mir sehr geholfen, nur hat sich bei Schritt 8. etwas geändert: Der Pfad zu den LaTex executables ist bei miktex-portable-2.9.6521.exe nun unter “D:\LaTeX\MikTeX\texmfs\install\miktex\bin” zu finden.
Guter Hinweis! Danke!
Zu Punkt 6)
TeXlipseBibSonomyExtension
Diese wird nicht mehr aufgelistet sondern ist nun unter dem folgenden Link gesondert hinzuzufügen; Version 0.1.1.1:
https://texlipse.bibsonomy.org/
Leider habe ich Probleme in Schritt 8; alle Pfade zu den Komponenten bleiben mit leeren Klammern und es gibt keinen Button den Pfad manuell zu zeigen.
So bleibt Eclipse unnutzbar.
Das Problem der Nicht-Registratur von TeXlipse ist plattformunabhängig bekannt. (MacOS, Windows…)
Über die Fehlermeldung in der Logdatei bin ich auf den Crash-Fix 61+62 der Entwickler (?) auf GitHub gestoßen;
allerdings noch für Eclipse Version 4.8 Codename Photon – danach folgten die Versionsnummern (dann ohne Codenamen) 2018-09 bis aktuell 2020-03:
“Texlipse preferences crash in Eclipse Photon Release (4.8.0)”
https://github.com/eclipse/texlipse/issues/61
In 2020-03 also immer noch (oder wieder) der gleiche Fehler:
(…) net.sourceforge.texlipse.properties.BuilderSettingsPreferencePage.addBuilderList(BuilderSettingsPreferencePage.java:185
Entwickler Torkild U. Resheim (“turesheim”) verlinkt hier folgenden Link:
https://ci.eclipse.org/texlipse/job/continuous/ws/org.eclipse.texlipse-site/target/repository/
Den habe ich probehalber im Installationsmanager hinzugefügt und installiert (auch obwohl ich bemerkt habe, dass eine Versionsnummer 2.x auf MacOS hindeutet; hier 2.0.3.201911080745, also vom 08. Nov. 2019 von 07:45 Uhr scheinbar)
Eclipse neugestartet.
Et voilà. Doppelte Einträge – aber die neuen funktionieren!
Versuche einen Clean Install. und anstatt obigem, in der Anleitung verlinkten Link dann meinen hier angegebenen zu verwenden.
FUNKTIONIERT!
Und zu Schritt 8 ein Update:
Der Pfad zu den LaTex executables ist bei miktex-portable-2.9.6942.0 ist nun „D:\LaTeX\MikTeX\texmfs\install\miktex\bin\x64“
Kannst du so übernehmen!
Install TeXlipse in Eclipse | April 2020:
FAQ
http://texlipse.sourceforge.net/faq.php
INSTALLATION
Step 1)
TeXlipse 2.x by Torkild U. Resheim
1.1) Go to HELP MENU and INSTALL NEW SOFTWARE
1.2) add
https://ci.eclipse.org/texlipse/job/continuous/ws/org.eclipse.texlipse-site/target/repository/
to the link grabber.
1.3) Confirm everything and restart Eclipse
1.4) Add Paths to the Apps AllInOne, e.g.:
2) PDF4Eclipse INSTALLATION
2.1) Go to HELP MENU and INSTALL NEW SOFTWARE (same menu as in 1.1))
2.2) Add
http://texlipse.sourceforge.net/
to the link grabber
2.3) VERY IMPORTANT:
Only (!) install PDF4Eclipse!
You already installed TeXlipse in Step 1.
2.4) Confirm everything and restart Eclipse.
At this time it is NOT POSSIBLE to work with
Not working at this point.
If you like to set up your Language now take step
4) Babel Language Packs R0.17.1
4.1) Go to HELP MENU and INSTALL NEW SOFTWARE (same menu as in 1.1))
4.2) Add
https://download.eclipse.org/technology/babel/update-site/R0.17.1/2019-12/
to the link grabber.
4.3) Confirm everything and restart Eclipse.
Ready to start.
Viel Glück!