Iterate over a possibly empty array in VBA (Excel)

When you try to iterate over an empty array in VBA like this, you will get a runtime error (index out of bounds):
Sub ArrayTest() Dim testarray() As Integer Dim i As Integer For i = LBound(testarray) To UBound(testarray) ' <-- error Debug.Print testarray(i) Next i End Sub

Even if you check the return value of LBounds like this, it results in the same error:
Sub ArrayTest() Dim testarray() As Integer Dim i As Integer If LBound(testarray) > 1 Then ' <-- error For i = LBound(testarray) To UBound(testarray) Debug.Print testarray(i) Next i End If End Sub

However, to get rid of the error and to iterate over a possibly empty array, the following code works:
Sub ArrayTest() Dim testarray() As Integer Dim i As Integer On Error Resume Next If LBound(testarray) > 1 Then If Err.Number = 0 Then For i = LBound(testarray) To UBound(testarray) Debug.Print testarray(i) Next i End If End If End Sub

Visual Basic magic 😉

SVG-Dateien in LaTeX einbinden

Wenn man mit LaTeX arbeitet, ist es sinnvoll, die verwendeten Grafiken in einem skalierbaren Dateiformat einzubinden, damit sie beim Druck genauso scharf aussehen wie der Text. Viele Vektorgrafiken (gerade auch in der Wikipedia) liegen heutzutage im SVG-Format vor.

Diese Dateien direkt in LaTeX einzubinden ist nach meinen Recherchen aktuell anscheinend noch nicht möglich. Es wird immer der Weg der Konvertierung der SVG-Datei in EPS oder PDF empfohlen. Beides ist mit der freien Software InkScape sehr einfach möglich: SVG-Datei öffnen, Speichern unter, Dateiformat auswählen, fertig.

Die PDF-Datei kann dann mittels \includegraphics{Datei.pdf} in LaTeX eingebunden werden.

Interview mit mir zum Einsatz von Wikis in Unternehmen bei NDR Info

Heute Morgen war ich in einem kurzen Interview zum Einsatz von Wikis in Unternehmen bei NDR Info im Radio zu hören. Schon Anfang Dezember war Christoph Heinzle vom NDR bei uns im Unternehmen und hat eine Kollegin und mich zu dem Thema interviewt.

Unser Wiki gibt es nun bereits seit einigen Jahren und es hat sich eine stattliche Anzahl an Artikeln angesammelt. Im Durchschnitt hat jeder EDV-Mitarbeiter über 100 Artikel verfasst, ob Dokumentationen, Arbeitsanweisungen oder Tutorials.

Hier gibt es den Online-Artikel zum Radiobeitrag: Firmen konservieren Wissen mit Wiki.

Getting PL/SQL Developer on Windows 7 64bit to connect to an Oracle database

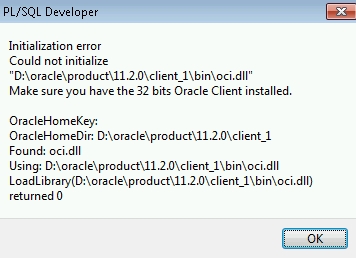
After I installed the latest version of PL/SQL Developer on my Windows 7 64bit machine today, I got the following error message when trying to connect to an Oracle database:

Initialization error
Could not initialize "D:\oracle\product\11.2.0\client_1\bin\oci.dll"
Make sure you have the 32 bits Oracle Client installed.
PL/SQL Developer Windows 7 64bit Oci Error

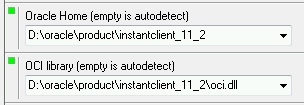
As I’ve found out, the solution is to install (actually, simply extracting the archive is enough) the latest 32bit version of the Oracle Instant Client and configure PL/SQL Developer to use it instead of the 64bit Oracle client under Tools – Preferences.

PL/SQL Developer Windows 7 64bit Settings

I found this solution here: Fix Initialization Error: LoadLibrary oci.dll returned 0 while trying to connect to Oracle using PL/SQL Developer.

However, PL/SQL Developer didn’t recognize my tnsnames.ora anymore after I switched to the 32bit Instant Client. The solution is pretty simple: just create the directory network\admin in the 32bit Instant Client’s directory and copy your tnsnames.ora from the real Oracle client’s directory there.

Installation of Microsoft Baseline Security Analyzer (MBSA) fails with error code 2738

When installing Microsoft Baseline Security Analyzer (MBSA) the installation on my Windows 7 64bit machine failed with error code 2738. However, I found the solution for this problem in the Chip forum:

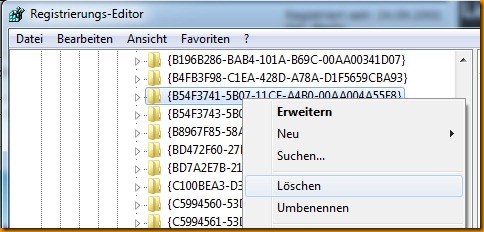
  • Remove the registry key HKEY_CURRENT_USER\SOFTWARE\Classes\Wow6432Node\CLSID\.
    MBSAError2738RegeditDeleteKey
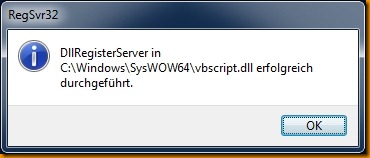
  • Register vbscript.dll running regsvr32 C:\Windows\SysWOW64\vbscript.dll as Administrator.MBSAError2738RegisterDLL2
    MBSAError2738RegisterDLL

How to add a local calendar to the Android 2.2 Froyo emulator

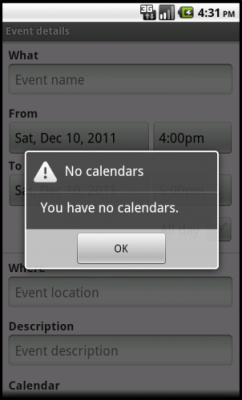
After I had successfully added the calendar application to my Android emulator running Android 2.2 (Froyo), I soon realized that I wasn’t able to create events in it because I had no calendars. Android gave me this nice message: You have no calendars.

Android 2.2 Froyo: You have no calendars

Searching the web for this problem lead me to the need of creating a Google account that then could be synced with the emulator’s calendar. However, the sync did not work. After setting up the account under Settings - Accounts and sync - Add account - Google it didn’t show up in the sync settings and there was still no calendar created for it.

The Android documentation said that it would be possible to create a calendar in an application, so I tried that. Quite a few hours of trying and debugging later, I finally found this post on StackOverflow, that contains a list of all the needed fields and correct values for them: After adding an event to a user-created calendar in android,the event title doesn’t show up.

So here’s the final piece of code that adds a local calendar to the Android emulator:
ContentValues vals = new ContentValues(); vals.put("_id", 1); vals.put("_sync_account", account.name); vals.put("_sync_account_type", account.type); vals.put("name", account.name); vals.put("displayName", account.name); vals.put("color", 14417920); vals.put("access_level", 700); vals.put("selected", 1); vals.put("ownerAccount", account.name); vals.put("sync_events", 1); vals.put("timezone", "GMT"); vals.put("hidden", 0); getContentResolver().insert(calUri, vals);
Where calUri is something like

content://com.android.calendar/calendars?caller_is_syncadapter=true&account_name=local&account_type=LOCAL

and account is an android.accounts.Account.

I’ve put the code into a small application that reads the available accounts and creates a local calendar via a simple click on a button.

Download

Attention: Your emulator has to run Google APIs (Google Inc.) – API Level 8 and not Android 2.2 – API Level 8.

Android Emulator running Google API 8

How to add the calendar application to the Android emulator running Android 2.2 Froyo

I was pretty confused when I found out that the Android emulator does not provide a basic calendar application. Starting with version 4.0 “Ice Cream Sandwich” there seems to be a calendar API, but when developing an application for an older version like 2.2 “Froyo” you not only have no common API for accessing the calendar but also haven’t even got access to a simple calendar application in the emulator. After searching the web for quite some time on how to get a calendar application running on my emulator, I know compiled one myself for Android 2.2. Here’s how to do it:

  1. First, I set up a complete build environment on a virtual machine running Ubuntu 10.4 64bit (download Ubuntu here) following this guide: Initializing a Build Environment.
  2. Be sure to download the correct sources:
    repo init -u https://android.googlesource.com/platform/manifest -b froyo
  3. When the download is ready, build the system, but only the needed components:
    . build/envsetup.sh
    lunch full-eng
    make Calendar
    make CalendarProvider
  4. You’ll find Calendar.apk and CalendarProvider.apk in /out/target/product/generic/system/app. Copy them to the machine running the Android emulator.
  5. Run the emulator and install the APKs:
    adb install Calendar.apk
    adb install CalendarProvider.apk
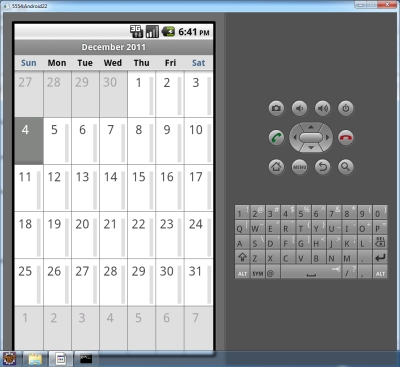
  6. Start the application in the emulator.
Calendar application in Android 2.2 Froyo emulator

Download the compiled APKs

Validating an XML file against a schema with Natural and Java

Although Natural provides (very basic) functionality to parse and load an XML file, I could not find a way to validate XML against a schema. So I wrote a small Java program that does the validation and can be called from Natural (on Linux) via a User Exit.

Here is the Natural code for subprogram XMLVALID. It validates an XML file against a given schema using User Exit USR1052N (call a shell command) redirecting the output to a temp file. If an error occurred it reads the temp file and returns the error message. It uses quite a few hard coded paths you may need to change on your system.

DEFINE DATA
*
PARAMETER USING XMLVALP
*
LOCAL USING XMLVALC
*
LOCAL
01 USR1052L
  02 OS-COMMAND (A253)
  02 RESPONSE   (I04)
*
01 #TEMPFILE (A) DYNAMIC
*
01 #WORK (A1000)
*
01 #DEFAULT-SCHEMA-PATH (A) DYNAMIC CONST <'/home/XML/'>
01 #INDEX (N4)
*
END-DEFINE
*
RESET XMLVALP-DEFAULT
*
EXAMINE FULL XML-SCHEMA FOR '/' GIVING POSITION IN #INDEX
IF #INDEX LE 0
  COMPRESS #DEFAULT-SCHEMA-PATH XML-SCHEMA INTO XML-SCHEMA LEAVING NO
END-IF
*
COMPRESS '/tmp/XML-Validation-' *DATN '-' *TIMN '.txt' INTO #TEMPFILE LEAVING NO
COMPRESS '/usr/bin/java -cp' #DEFAULT-SCHEMA-PATH 'XMLValidator' XML-FILE XML-SCHEMA '>' #TEMPFILE INTO OS-COMMAND
*
CALLNAT 'USR1052N' USR1052L
XMLVALP.XML-RESULT := RESPONSE
*
IF XMLVALP.XML-RESULT NE VALID-XML
  DEFINE WORK FILE 1 #TEMPFILE TYPE 'ASCII'
  READ WORK 1 #WORK
    COMPRESS XML-ERROR #WORK INTO XMLVALP.XML-ERROR
  END-WORK
  CLOSE WORK 1
END-IF
*
COMPRESS 'rm' #TEMPFILE INTO OS-COMMAND
CALLNAT 'USR1052N' USR1052L
*
END

The Java validator is pretty straightforward:
package xml; import java.io.File; import java.io.IOException; import javax.xml.XMLConstants; import javax.xml.parsers.DocumentBuilder; import javax.xml.parsers.DocumentBuilderFactory; import javax.xml.transform.dom.DOMSource; import javax.xml.validation.Schema; import javax.xml.validation.SchemaFactory; import javax.xml.validation.Validator; import org.w3c.dom.Document; import org.xml.sax.SAXParseException; public class XMLValidator { private final static int INVALID_PARAMETERS = 1; private final static int INVALID_XML = 2; private final static int INVALID_FILE = 3; private final static int ANY_ERROR = 4; public static void main(String[] args) { if (args.length != 2) { System.out.println("Usage: XMLValidator PathToXMLFile PathToSchemaFile"); System.exit(INVALID_PARAMETERS); } String xmlFile = args[0]; String xsdFile = args[1]; try { validateXml(xmlFile, xsdFile); } catch (Exception e) { System.out.println("Error: " + e.getMessage()); System.exit(ANY_ERROR); } } private static void validateXml(String xmlFile, String xsdFile) throws Exception { // create a factory that understands namespaces and validates the XML input DocumentBuilderFactory factory = DocumentBuilderFactory.newInstance(); factory.setNamespaceAware(true); try { // read the XML file DocumentBuilder builder = factory.newDocumentBuilder(); Document mDoc = builder.parse(new File(xmlFile)); // create a SchemaFactory capable of understanding schemas SchemaFactory schemaFactory = SchemaFactory.newInstance(XMLConstants.W3C_XML_SCHEMA_NS_URI); // load the schema Schema schema = schemaFactory.newSchema(new File(xsdFile)); // validate the XML file Validator validator = schema.newValidator(); validator.validate(new DOMSource(mDoc)); } catch (SAXParseException spe) { // error generated by the parser System.out.println("Parser error: URI " + spe.getSystemId() + ", Line " + spe.getLineNumber() + ", Message: " + spe.getMessage()); System.exit(INVALID_XML); } catch (IOException ioe) { System.out.println("Error reading file '" + xmlFile + "'."); System.exit(INVALID_FILE); } } }

Download

Changing the path to the key files in GnuPG for Windows

GnuPG for Windows 7 stores all its key files in %USERPROFILE%\AppData\Roaming\gnupg, but I wanted to change this path, say to D:\Profile\GPG, so that the files can easily be backed up.

It turns out, there are quite a few different methods to change the path: changing the default keyring location in windows.

I chose to change the config file %USERPROFILE%\AppData\Roaming\gnupg\gpg.conf and added these lines:

no-default-keyring
primary-keyring D:\Profile\GPG\pubring.gpg
secret-keyring  D:\Profile\GPG\secring.gpg
trustdb-name    D:\Profile\GPG\trustdb.gpg
keyring         D:\Profile\GPG\pubring.gpg

Then I moved all the key files to the new location, leaving only gpg.conf in the original path.

Edit: After reconsidering my backup, I set the environment variable GNUPGHOME to D:\Profile\GPG instead of changing gpg.conf. This way, all files related to GPG including the configuration are stored in one location.