How to ignore a complete Java package in Checkstyle

One of my Java projects contains generated code which produces quite a few Checkstyle warnings. To ignore all files in this package, I needed to configure Checkstyle’s module SuppressionFilter as described in Checkstyle’s documentation:

File checkstyle.xml (Checkstyle config):

<module name="SuppressionFilter">
    <property name="file" value="suppressions.xml"/>
</module>

File suppressions.xml:

<?xml version="1.0"?>
<!DOCTYPE suppressions PUBLIC
    "-//Puppy Crawl//DTD Suppressions 1.1//EN"
    "http://www.puppycrawl.com/dtds/suppressions_1_1.dtd">
<suppressions>
    <suppress checks="." files="[\\/]PACKAGENAME[\\/].*\.java$"/>
</suppressions>

This ignores all files whose path contains /PACKAGENAME/.

Stellenangebot: Softwareentwickler und Mathematiker in Vechta gesucht

Wir suchen bei der ALTE OLDENBURGER Krankenversicherung AG in Vechta aktuell wieder neue Kollegen im Bereich der Softwareentwicklung und der Mathematik. Die entsprechende Anzeige erscheint heute in einigen Tageszeitungen, ist auf unserer Website verfügbar und ab Montag sollte auch auf unserer Unternehmensseite bei Xing etwas zu finden sein.

Hier kommt noch schnell der Text unserer Stellenanzeige:

Zum nächstmöglichen Termin suchen wir eine/n

Softwareentwickler (m/w) und/oder Mathematiker (m/w)

Ihre Aufgaben

  • Neu- und Weiterentwicklung unserer versicherungstechnischen Anwendungssysteme, insbesondere im Bereich der Produktentwicklung.
  • Ausrichtung der Anwendungen an der serviceorientierten Architektur.
  • Wartung der betreuten Systeme und Beratung der Fachbereiche.

Ihr Profil

  • Abgeschlossene Ausbildung zum Fachinformatiker Anwendungsentwicklung oder ein abgeschlossenes (FH-)Studium im Bereich (Wirtschafts-)Informatik oder Software-Engineering.
  • Oder: Abgeschlossenes Studium im Bereich Mathematik (z.B. Diplom, Master), idealerweise mit Schwerpunkt Informatik.
  • Wünschenswert sind 2 Jahre Berufserfahrung in der Softwareentwicklung in mindestens einer der Programmiersprachen Java, C# oder Natural.
  • Breites Interessenspektrum und die Bereitschaft zur selbstständigen Einarbeitung in verschiedene technologische Bereiche.

Also nichts wie los und bewerben! 🙂 Die Kontaktdaten stehen hier: Stellenangebote der ALTE OLDENBURGER AG.

Wer nicht bei uns arbeiten möchte, aber an einem Gedankenaustausch mit anderen Softwareentwicklern in der Region Oldenburger Münsterland interessiert ist, den lade ich gerne in unsere neue Xing-Gruppe ein: Softwareentwicklung im Raum Oldenburger Münsterland

Rezension: Professional Test Driven Development with C# (Bender, McWherter)

Ich bin über eine Podcast-Episode von “Deep Fried Bytes” (Episode 73: Developing Real World Applications with TDD with James Bender and Jeff McWherter) auf das Buch “Professional Test Driven Development with C#: Developing Real World Applications with TDD” von James Bender und Jeff McWherter aufmerksam geworden und habe es mir gleich für den Kindle zugelegt.

Die Autoren liefern mit diesem Buch einen Rundumschlag zur testgetriebenen Softwareentwicklung mit C#. Zusätzlich zu den theoretischen Hintergründen von TDD und der agilen Softwareentwicklung werden anhand eines konkreten Beispielprojekts verschiedenste Frameworks (NUnit für die Unit-Tests, NBehave für Business Driven Development, Ninject für Dependency Injection, Moq für Stubs und Mocks usw.) mit Schritt-für-Schritt-Anleitungen eingeführt. Der dabei entstehende Code mag auf den ersten Blick recht umfangreich sein (allein mehrere Klassen und Methoden für den ersten Test), aber das Design ist praxistauglich und leicht erweiterbar.

Das Buch ist gespickt mit allerlei zusätzlichen Einführungen und Tipps rund um die agile Softwareentwicklung. Seien es die SOLID-Prinzipien, Refactoring, User Stories oder Code Smells: das Buch ist voll von einsteigertauglichen Erklärungen und Beispielen.

Sehr gut gefallen hat mir der Teil über die Strukturierung der C#-Projekte und ihrer Abhängigkeiten in Visual Studio. Hilfreich sind auch die zusätzlichen Kapitel über das Testen von WCF- und WPF-Anwendungen. Hierbei werden sofort konkrete Beispiele mit Bezug zum Beispielprojekt gegeben, die sich direkt in der Praxis anwenden lassen. Dabei wird darauf geachtet, dass in den Tests von der “Infrastruktur” (Services bzw. GUI) abstrahiert wird und Stubs bzw. Mocks für schnelle und wiederholbare Tests zum Einsatz kommen.

Ich empfehle dieses Buch definitiv meinen Auszubildenden und Studenten als Literatur zum Einstieg in das Thema Unit-Tests mit C#!

Ausbildungsplatz zum Fachinformatiker Anwendungsentwicklung bzw. Duales Studium Wirtschaftsinformatik zum 01.08.2014 in Vechta

Wie in den letzten Jahren bieten wir bei der ALTE OLDENBURGER Krankenversicherung AG

Logo ALTE OLDENBURGER

auch im nächsten Jahr wieder einen Ausbildungs-/Studienplatz im EDV-Bereich an: Zum 01.08.2014 suchen wir

  • einen Auszubildenden (m/w) zum Fachinformatiker Anwendungsentwicklung bzw.
  • einen dualen Studenten (m/w) der Wirtschaftsinformatik in Zusammenarbeit mit dem Department für duale Studiengänge der Fachhochschule Osnabrück am Studienstandort Lingen.
Logo BA Emsland

Hier geht es zur kompletten Stellenanzeige mit Anschrift für die Bewerbungsunterlagen: Stellenangebote bei der ALTE OLDENBURGER.

Weitere Informationen zum Ausbildungsberuf Fachinformatiker Anwendungsentwicklung gibt es auf der Website der ALTE OLDENBURGER sowie bei der IHK Oldenburg und der BBS Haarentor. Der Studiengang Wirtschaftsinformatik wird auf der Website der BA Emsland im Detail beschrieben: Studiengang Wirtschaftsinformatik bei der BA Emsland.

Ich freue mich auf alle Bewerbungen und vielleicht arbeiten wir bald zusammen 🙂

SuSE Linux (SLES) 11: SSH authentication via Kerberos (GSSAPI) with PuTTY and Windows Server 2008

After many days of trial and error, today I finally managed to automatically log on to my SuSE Linux 11 (SLES11) server with PuTTY using Kerberos authentication by a Windows Server 2008. Here are the exact steps I followed to reproduce the working configuration:

Follow the setup described in Michele’s blog: Active Directory and Apache Kerberos authentication and Putty, Active Directory and Kerberos. However, for creating the keytab file, follow my instructions below. Michele generates his keytab file with this command on the Linux server: net ads keytab add -U administrator This associates the Service Principal Name (SPN) of your Linux server with its machine account in the Active Directory. However, the machine account’s password gets reset by the Active Directory on a regular basis and when this happens, the KVNO in the Active Directory gets incremented, but this is not reflected in the Linux server’s keytab and suddenly Kerberos does not work anymore. You may get an error like this in the SSH log:

sshd[30106]: debug1: Unspecified GSS failure.  Minor code may provide more information\nKey version number for principal in key table is incorrect\n

So instead of using the machine’s account, we will use a (technical) user account specifically created for this task, that has a password which never expires. Therefore, its KVNO never changes and Kerberos will continue to work (or at least I hope so ;-)).

  1. Make sure that no account in the Active Directory has the SPN of the Linux server you want to log on to. Even delete the SPN from the Linux machine’s account itself! You can use the attribute editor (or ADSI editor) on the server. Check the SPN with this command:
    ldifde -f c:\spn_out.txt -d "<strong>DC=yourdomain,DC=com</strong>" -l *,msDS-KeyVersionNumber -r "(serviceprincipalname=HOST/<strong>yourlinuxhostname</strong>*)" -p subtree The result should show 0 entries! Otherwise you may get a message like the following in PuTTY’s event log:

    The target was not recognized (SEC_E_TARGET_UNKNOWN)
  2. Create a user account in the Active Directory that you want to associate with the Linux server, e.g. tukerberos. Set the account’s password and make sure to configure it to never expire.
  3. Associate the user account with the SPN of the Linux server with this command: ktpass -princ host/<strong>yourlinuxhostname.yourdomain.com@YOURDOMAIN.COM</strong> -mapuser <strong>yourdomain\tukerberos</strong> -ptype KRB5_NT_PRINCIPAL -pass <strong>USERPASSWORD</strong> -crypto All -out c:\krb5.keytab
    The output should look like this:

    Targeting domain controller: dc.yourdomain.com
    Using legacy password setting method
    Successfully mapped host/yourlinuxhostname.yourdomain.com to tukerberos
    .
    Key created.
    Key created.
    Key created.
    Key created.
    Key created.
    Output keytab to c:\krb5.keytab:
    Keytab version: 0x502
    keysize 101 host/yourlinuxhostname.yourdomain.com@YOURDOMAIN.COM ptype 1 (KRB5_NT_PRINCIPAL) vno 3 etype 0x1 (DES-CBC-CRC) keylength 8 (0x46629e67156b3b40)
    keysize 101 host/yourlinuxhostname.yourdomain.com@YOURDOMAIN.COM ptype 1 (KRB5_NT_PRINCIPAL) vno 3 etype 0x3 (DES-CBC-MD5) keylength 8 (0x46629e67156b3b40)
    keysize 109 host/yourlinuxhostname.yourdomain.com@YOURDOMAIN.COM ptype 1 (KRB5_NT_PRINCIPAL) vno 3 etype 0x17 (RC4-HMAC) keylength 16 (0x0149b059adfce2da6ae4319fbcf100f0)
    keysize 125 host/yourlinuxhostname.yourdomain.com@YOURDOMAIN.COM ptype 1 (KRB5_NT_PRINCIPAL) vno 3 etype 0x12 (AES256-SHA1) keylength 32 (0x9a9c4dad7b65d0b294164dce8bbd5b4b39d674741bca1ef4f1583e6a8e77313b)
    keysize 109 host/yourlinuxhostname.yourdomain.com@YOURDOMAIN.COM ptype 1 (KRB5_NT_PRINCIPAL) vno 3 etype 0x11 (AES128-SHA1) keylength 16 (0xcc466c3cd0e3828f91a60556058a29b5)

    If you run the ldifde command from above again, you should now get a result of 1 entry for tukerberos!

  4. Copy the file c:\krb5.keytab over to the Linux server as /etc/krb5.keytab.
  5. If you run klist -kte on the Linux server now, you should see 5 entries for its SPN:
    Keytab name: FILE:/etc/krb5.keytab
    KVNO Timestamp         Principal
    ---- ----------------- --------------------------------------------------------
       3 01/01/70 01:00:00 host/yourlinuxhostname.yourdomain.com@YOURDOMAIN.COM (DES cbc mode with CRC-32)
       3 01/01/70 01:00:00 host/yourlinuxhostname.yourdomain.com@YOURDOMAIN.COM (DES cbc mode with RSA-MD5)
       3 01/01/70 01:00:00 host/yourlinuxhostname.yourdomain.com@YOURDOMAIN.COM (ArcFour with HMAC/md5)
       3 01/01/70 01:00:00 host/yourlinuxhostname.yourdomain.com@YOURDOMAIN.COM (AES-256 CTS mode with 96-bit SHA-1 HMAC)
       3 01/01/70 01:00:00 host/yourlinuxhostname.yourdomain.com@YOURDOMAIN.COM (AES-128 CTS mode with 96-bit SHA-1 HMAC)
  6. To make sure that no already existing tickets are used, purge your local ticket cache using kerbtray.exe on your Windows client and run the following command on your Linux server: kdestroy kinit Administrator
  7. Try logging on to your Linux server with PuTTY. It should work now 🙂

Further reading

Setting the position of guidelines in PowerPoint from a VBA script

As I had to find out today, you cannot set the position of guidelines in PowerPoint from a VBA macro. But if you need a set of accurately positioned guidelines like shown in the screenshot below (exactly 32 vertical guidelines with the same distance between them), it would be almost impossible to position them by hand.

Accurately positioned PowerPoint guidelines

However, as you may know, PowerPoint’s PPTX files are simply zipped XML files, that can be extracted, analyzed (e.g. diffed), and modified. So I did exactly that and found out that the presentation’s guidelines are defined in ppt\viewProps.xml.
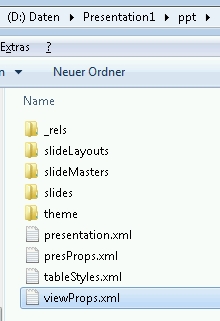
PowerPoint viewProps.xml

Having placed a single vertical guideline at both ends of the slide in an empty presentation, the corresponding part in viewProps.xml looks like this:

<p:guideLst> <p:guide orient="horz" pos="2160"/> <p:guide /> <p:guide pos="5760"/> </p:guideLst>

So, the rightmost position of a guideline in PowerPoint’s internal unit of measurement (whatever that is) is 5760. Now you can divide this number by the number of guidelines you would like to have (32 in my case) and add new lines to the XML file accordingly:

<p:guideLst> <p:guide orient="horz" pos="2160"/> <p:guide /> <p:guide pos="180"/> <p:guide pos="360"/> ... <p:guide pos="5760"/> </p:guideLst>

Now you can zip up the folder again, rename the file to pptx and open it in PowerPoint.

As the title of this blog post suggests, the above process could be automated. However, as zip file handling is not built in into PowerShell at the moment, I leave this exercise for the reader 😉

Ausbildungsplatz zum Fachinformatiker Anwendungsentwicklung bzw. Duales Studium Wirtschaftsinformatik zum 01.08.2013 in Vechta

Wie in den letzten Jahren bietet die ALTE OLDENBURGER Krankenversicherung AG

Logo ALTE OLDENBURGER

auch in diesem Jahr wieder einen Ausbildungs-/Studienplatz im EDV-Bereich an: Zum 01.08.2013 suchen wir

  • einen Auszubildenden (m/w) zum Fachinformatiker Anwendungsentwicklung bzw.
  • einen dualen Studenten (m/w) der Wirtschaftsinformatik in Zusammenarbeit mit dem Department für duale Studiengänge der Fachhochschule Osnabrück am Studienstandort Lingen.
Logo BA Emsland

Hier geht es zur kompletten Stellenanzeige mit Anschrift für die Bewerbungsunterlagen: Stellenangebote bei der ALTE OLDENBURGER.

Weitere Informationen zum Ausbildungsberuf Fachinformatiker Anwendungsentwicklung gibt es auf der Website der ALTE OLDENBURGER sowie bei der IHK Oldenburg und der BBS Haarentor. Der Studiengang Wirtschaftsinformatik wird auf der Website der BA Emsland im Detail beschrieben: Studiengang Wirtschaftsinformatik bei der BA Emsland.

Ich freue mich auf alle Bewerbungen und vielleicht arbeiten wir bald zusammen 🙂

Installing and configuring MikTeX, TeXlipse, and Pdf4Eclipse to write and compile LaTeX documents

Setting up a “development” environment for LaTeX is quite complicated compared to installing Microsoft Word 😉 And it gets even more complicated, if you decide to use Eclipse as the platform for writing your documents. However, as I had to setup such an environment from scratch today, here’s how I did it with minimum impact on the system.

  1. (Optionally) create a base directory in which all of the programs below will get installed, e.g. D:\LaTeX.
  2. Download MikTeX – Portable Edition and extract it to D:\LaTeX\MikTeX.
  3. Download and install the JDK: Java SE Downloads. If you have security concerns like me, make sure to download the latest version and enable daily updates and/or disable the Java plugin in your browser.
  4. Download Eclipse (the most basic version will do, e.g. “classic” or “for Java developers”) and extract it to D:\LaTeX\Eclipse.
  5. Start Eclipse and choose a convenient path for the workspace (where your LaTeX projects will get saved), e.g. D:\LaTeX\Workspace.
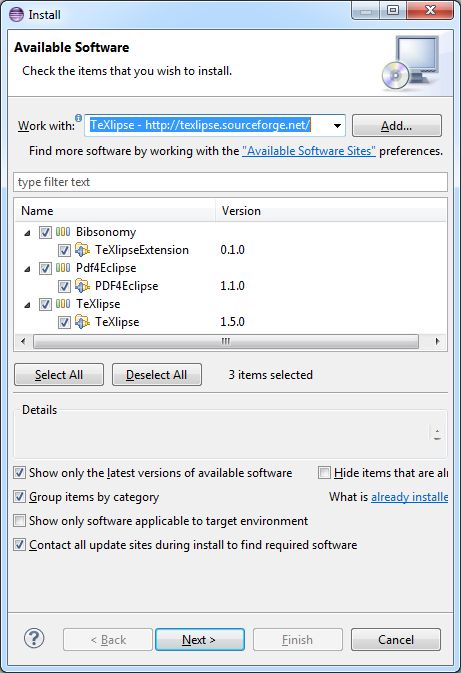
  6. Install TeXlipse into Eclipse: Help – Install New Software – Add a new repository with name “TeXlipse” and location “http://texlipse.sourceforge.net/”. Select all installable items as shown below. As you can see, Pdf4Eclipse will already be installed, too.
    Installation of TeXlipse
    Simply click through the installation wizard and restart Eclipse after the installation is finished.
    Warning: Starting with Eclipse Photon the version of TeXlipse shown above doesn’t work anymore. Please use the Eclipse Marketplace to install a newer version like 2.0.2.
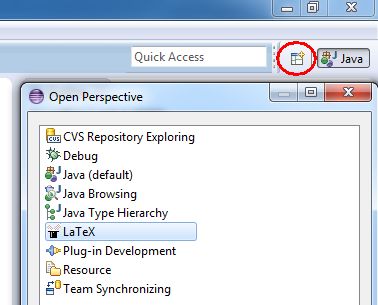
  7. After TeXlipse is installed, you should already be able to open the LaTeX perpective in Eclipse.
    Open the LaTeX perspective in Eclipse
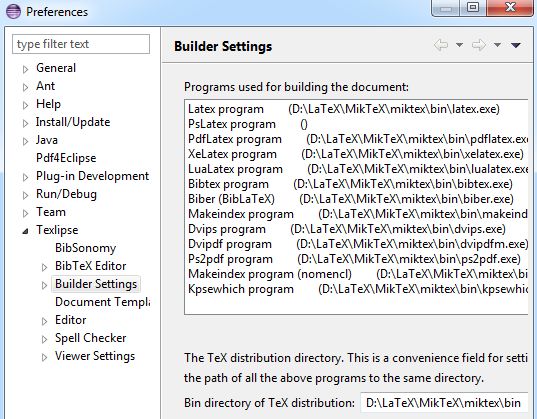
  8. Now it’s time to tell TeXlipse where it can find your LaTeX executables and therefore be able to compile your LaTeX documents. Go to Window – Preferences – Texlipse – Builder Settings, enter the path to your MikTeX executables – D:\LaTeX\MikTeX\miktex\bin – into Bin directory of TeX distribution, and click Apply. That should automatically fill in all the needed programs in Programs used for building the document for you.
    Configure TeXlipse to use MikTeX
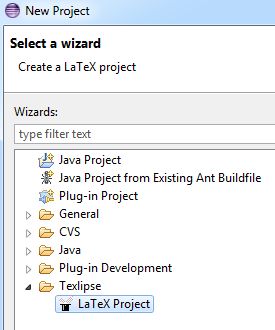
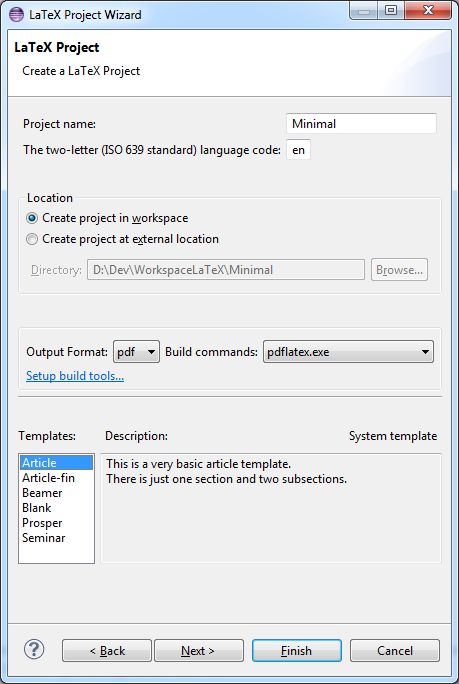
  9. Now you should already be able to create and compile your first LaTeX project. Right-click into your Project Explorer and create a new project.
    Create a new LaTeX project with TeXlipse
    Create a new LaTeX project with TeXlipse (2)
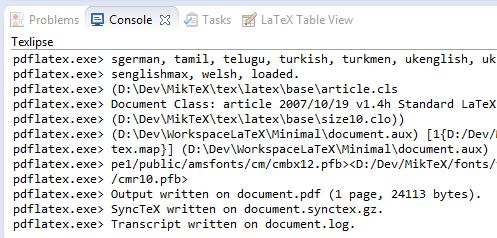
    If you save document.tex, it should automatically be compiled. Take a look at the corresponding console output.
    Compiling a LaTeX project with TeXlipse
  10. If you double-click on the created document.pdf file in the Project Explorer (a Refresh may be needed to show the file), it should be opened with Pdf4Eclipse. If you double-click a line in the PDF file, Eclipse should now jump to the corresponding position in your LaTeX source. And that’s it! Now you can start writing your LaTeX document. If you need a template, take a look at these blog posts (they are in German):